

Pulling a vacuum on your car’s AC system typically takes 30 to 45 minutes, but it can vary depending on its condition. The goal is to remove all moisture and air, which can harm the AC if left behind.
If your system leaks or hasn’t been maintained, you must run the vacuum for an hour or more. After vacuuming, do a vacuum hold test to ensure your system is airtight before adding refrigerant. Let’s get better and more detailed:
Why Do You Need to Pull a Vacuum on a Car AC System Anyway?
Most people don’t realize that when they open the AC system for repairs, air and moisture sneak inside, even if they’re quick. The air holds moisture, like kryptonite, for the AC system.
It creates many issues, like freezing up in the lines or damaging the compressor. So, pulling a vacuum on it? It’s like cleaning out the attic before storing your valuables.
It would help if you had the apparatus to dry and empty before you add the refrigerant. Otherwise, you’re inviting trouble back in, and no one wants that.
The Moment of Truth: How Long Do You Pull a Vacuum?
Most people aim to vacuum the device for about 30 to 45 minutes. That’s a good rule of thumb. You want enough time for the vacuum pump to pull out all the air, moisture, and other gremlins lurking inside.
But—and this is where the unpredictability comes in—it can depend on your specific setup. How long your device was open, the condition of your equipment, and even the weather can tweak this timeline a bit.
Now, don’t be surprised if it takes longer. I’ve heard of instances where people ran their vacuum pumps for over an hour, sometimes closer to two.
Why? They were getting tiny leaks that needed more time to clear, or the setup must have been maintained better.
Step-by-Step Breakdown (But Let’s Keep It Real)
I want to guide you through these steps as if we’re working together.
Step 1: Gather Your Tools and Gear Up
First things first—you need the right tools: a vacuum pump, a manifold gauge set, and your patience. Double-check your connections.
Step 2: Hook Up the Manifold Gauge
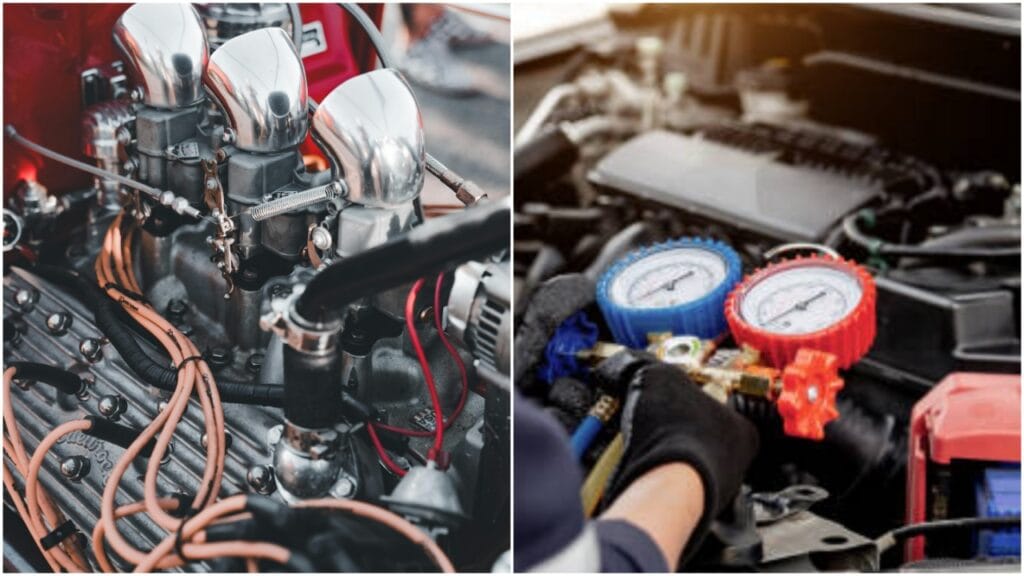
This is where things get a little technical. You’ll connect your manifold gauge set to the car’s low—and high-pressure service ports.
The low-pressure port is usually closer to the compressor, and the high-pressure one is near the condenser. Just follow the lines; it’s hard to go wrong. Once that’s hooked up, you’re almost ready.
Step 3: Fire Up the Vacuum Pump
Here’s the part where I made a critical error the first time. I figured you flip the switch and walk away. Don’t do that! You want to watch the gauges like a hawk for the first few minutes. It should start pulling a vacuum reasonably quickly, and you’ll see the pressure dropping toward zero.
The real trick here is watching that gauge. If it drops and then starts creeping back up, you leak somewhere. At that point, you’re troubleshooting instead of vacuuming, but that’s part of the fun (or frustration, depending on how you look at it).
Step 4: Let It Run
Now, we wait. This is where most people get impatient, but trust me, it’s worth taking your time. Thirty minutes feel like forever, especially when you’re standing there wondering if it’s doing anything.
But remember what I said earlier—this is like cleaning out your attic. You want it clean, dry, and ready for new refrigerant. While it’s running, recheck the gauge. You’re clear on whether it holds steady at zero for a reasonable time.
Step 5: Do a Vacuum Hold Test
This step is crucial. Once you think you’ve vacuumed long enough, turn off the pump and see if the vacuum holds steady. Wait for about 10 to 15 minutes and watch that gauge. If the pressure stays the same, you’re golden. If it starts rising, you’ve got a leak, and it’s back to square one for you.
Step 6: Recharge the setup
When you’re satisfied that the vacuum is held and all the air and moisture are gone, recharging the unit with refrigerant is time. But don’t rush it. You’ve come this far—take a moment to appreciate how smoothly the AC will run once you’re done.
The Final Takeaway
Pulling a vacuum on your car’s AC system seems minor, but it can make or break your repair.
Rushing through this step is tempting, especially when you’re eager to return to the cool breeze, but taking your time will pay off in the long run.
On average, you should aim for at least 30 minutes of vacuuming but constantly adjust depending on your situation.
FAQ’s
How to pull a vacuum on car AC?
Pulling a vacuum on your car’s AC system is critical before recharging it with refrigerant. It removes air, moisture, and contaminants that can harm the system.
You’ll need a vacuum pump and a manifold gauge set. Start by connecting the gauges to the AC service ports.
The blue hose goes to the low-pressure side, and the red to the high-pressure side. Attach the yellow hose to the vacuum pump.
Turn the pump on and let it run. The vacuum should reach about 29 inches of mercury (Hg) on the gauge. This usually takes 15 to 30 minutes.
Once it reaches the desired level, close the manifold valves and turn off the pump. Let the system sit for another 15 minutes to check for leaks.
If the vacuum holds steady, the system is sealed. If it drops, a leak needs fixing before moving forward.
Pulling a vacuum ensures the AC system works efficiently and avoids damage from moisture freezing or mixing with the refrigerant.
What side do you pull a vacuum on ac system?
You pull a vacuum on both the high and low-pressure sides of the AC system. Both sides need to be cleared of air and moisture for the system to work properly.
Use a manifold gauge set to connect to the high and low ports. The vacuum pump attaches to the center port of the gauge set. This setup lets the vacuum reach the entire system.
Skipping one side won’t fully clean the system, so make sure both are included. It’s the right way to prep your AC for refrigerant.
Why do you pull a vacuum on ac system?
Pulling a vacuum on an AC system clears out moisture and air, which are bad news for your AC. Moisture can freeze and block cooling, and it also causes corrosion inside the system.
Air reduces cooling efficiency and puts stress on the compressor. A vacuum pump removes these contaminants, ensuring the system is clean and ready for the refrigerant.
Without this step, your AC won’t work right and could face costly damage. It’s a crucial part of keeping your AC cold and reliable.
Pulling a vacuum on car AC?
Pulling a vacuum on your car’s AC is a must before recharging it. This clears out moisture and air. You’ll need a vacuum pump and a gauge set.
Hook it up to the low and high-pressure ports. Start the pump and let it run. It usually takes 20 to 30 minutes. This creates a deep vacuum, removing contaminants.
Shut the pump off and watch the gauge. The vacuum should hold steady for about 10 minutes. If it drops, there’s a leak.
Fix the leak before moving forward. Once it’s sealed and vacuumed, your system is ready for refrigerant.
How to pull vacuum on car AC?
To vacuum your car’s AC system, you need a refrigerant recovery machine, which professionals typically use. First, ensure the vehicle is turned off, and the AC is not running. Locate the low-pressure service port on the AC system. Attach the recovery machine’s hose to this port.
Once connected, turn on the machine to start evacuating air, moisture, and refrigerant left in the system. The vacuum process usually takes around 30 minutes to an hour. During this time, the machine creates a vacuum, pulling out contaminants. This step is important to prevent damage when recharging the AC.
After vacuuming, check the system for leaks using a leak detector. Once you’re sure it’s leak-free, disconnect the vacuum machine. Now, you can recharge the system with the correct amount of refrigerant as specified in your car’s manual. Keep in mind that working with AC systems requires the proper tools and knowledge.
Do you vacuum high and low-side AC?
Yes, when vacuuming a car’s AC system, you must vacuum both the high and low sides. This is one of those steps you want to take advantage of because it directly affects how well your AC performs once it’s recharged with refrigerant.
The high and low sides are integral parts of the machinery, so when you’re removing air and moisture, you want to ensure you’re doing it from every nook and cranny.
Let me explain why this matters. The low side is where refrigerant enters the apparatus as a gas, and the high side is where it gets compressed into a liquid before being circulated to cool your car.
If you only vacuum one side, like the low side, you leave the high side exposed to contaminants like air and moisture. These contaminants can mix with the refrigerant and cause issues, from reducing the cooling efficiency to damaging internal components like the compressor.
Moisture, in particular, is a nightmare for AC systems because it can freeze and block the refrigerant flow or turn into corrosive acid when it interacts with the refrigerant oil.
Here’s the good news: vacuuming both sides is more accessible. When you connect your manifold gauge set, you’ll have two hoses—one for the high side (usually red) and one for the low side (typically blue). You attach both to the corresponding service ports on your car’s AC system.
Once everything is connected and sealed, you hook up your vacuum pump and let it run. The vacuum will pull from both sides simultaneously, meaning you’re continuously cleaning out both the high and low sides.
By vacuuming both sides, you ensure that when you recharge the machine with refrigerant, it’s running in a clean, dry environment. That means no unwanted moisture, air bubbles messing with the flow, and no future problems creeping up.
So, yes, both the high and low sides need your attention, and taking the time to vacuum them properly will make a world of difference in how well your AC system performs.
AC system holds vacuum overnight?
If your car’s AC system functions correctly, it should hold a vacuum overnight without any pressure loss. When you pull a vacuum on it, you remove all the air and moisture, creating a vacuum environment critical for ensuring it is leak-free before adding refrigerant.
The real test comes after you shut off the vacuum pump and let it sit. If the vacuum holds steady for several hours—ideally overnight—it’s a sign that your AC system is sealed tight and free from leaks. No pressure loss means no air is sneaking back in, and more importantly, no refrigerant will leak out once you recharge it.
But if the vacuum doesn’t hold, it’s a red flag. Even a slight pressure drop indicates a leak somewhere in the setup, whether from the hoses, seals, compressor, or one of the other components.
A leak may not always be apparent, but even a tiny one can cause long-term damage, leading to moisture entering the configuration or refrigerant escaping once you recharge it. If the vacuum doesn’t hold, you’ll need to inspect for leaks using a method like UV dye or a leak detector and repair any problem areas before proceeding.
Why is holding a vacuum so important?
Because air and moisture are the enemies of your AC system, if air gets in, it can create bubbles in the refrigerant flow, reducing the efficiency of the cooling process. Moisture, on the other hand, is even worse.
When mixed with refrigerant, it can turn into corrosive acid that eats away at the internal components like the compressor or condenser, leading to costly repairs. It can also freeze inside the lines, causing blockages that prevent refrigerant from circulating correctly.
You’re in good shape if your AC system holds a vacuum overnight. This means it is tightly sealed, leak-free, and ready for a fresh refrigerant charge.
Skipping this step or not paying attention to a vacuum that doesn’t hold can lead to more significant issues later. Taking the time to make sure the vacuum holds overnight is one of the best ways to ensure your AC runs efficiently and lasts longer.
How to bleed AC system car?
Bleeding a car’s AC system, or more precisely evacuating it, involves removing air and moisture to prepare it for a fresh refrigerant charge. If you’ve ever done DIY AC work, you know that air and moisture are the enemies of a well-functioning system. Here’s how you tackle the process:
First, you’ll need a vacuum pump and a manifold gauge set. These are essential tools for getting the job done. Connect the manifold gauges to the high—and low-pressure service ports on the AC system.
Then, attach the vacuum pump to the middle hose of the gauge set. When you turn the pump on, it pulls a vacuum, effectively “bleeds” the equipment of any unwanted air or moisture hiding inside.
This vacuum process usually takes 30 to 45 minutes, depending on the size and condition of your system. You want to ensure it runs long enough to remove every bit of moisture.
Once the vacuuming is done, let it sit for a bit to ensure the vacuum holds, which tells you there are no leaks. If the vacuum holds steady, you can recharge it with refrigerant.
This step is critical because air pockets or moisture left inside can reduce the efficiency of the AC and even cause damage over time. By properly evacuating your AC unit, you make sure your AC operates at peak performance, delivering that cool air we all crave, especially in the summer heat.
How can air be purged from the car’s AC system?
Purging air from a car’s AC system is crucial because air can reduce cooling efficiency and cause damage. To properly purge air, evacuate the AC using a vacuum pump and manifold gauge set.
First, connect the gauges to the AC setup’s high and low-pressure ports. Then, attach the vacuum pump to the gauge set and turn it on. The vacuum pump will remove air, moisture, and other contaminants from your setup.
Let the pump run for 30 to 45 minutes, ensuring a thorough evacuation. Once the air and moisture are purged, allow it to sit and verify that it holds the vacuum, which confirms there are no leaks.
Afterward, you can safely recharge your setup with refrigerant. This process ensures your AC runs efficiently and prevents long-term damage caused by air or moisture left in the setup.
Conclusion
Purging air from your car’s AC system is essential to ensure its efficient operation and good health. Using a vacuum pump to remove air and moisture can prevent issues like reduced cooling performance or potential damage to critical components.
Properly evacuating it before recharging it with refrigerant will save you headaches and ensure you get the cold air you need when the heat is on. It’s a small but crucial part of maintaining a smooth-running AC system ready to handle whatever the weather throws.
Contact us now for any information regarding your automotive needs. Thank you!