

If your car runs rough, gets worse gas mileage, or turns on the check engine light with codes like P0171 or P0174, it could have a vacuum leak. This happens when air sneaks into the engine without going through the air filter or mass airflow sensor. That extra air throws off the fuel mixture, making it too lean—meaning there’s more air than fuel. A lean mixture can cause poor performance and, over time, damage engine parts.
A lean mix can cause:
- Shaky idle
- Poor gas mileage
- Weak acceleration
- Hard starts
- Engine stalling
- Damage to oxygen sensors or the catalytic converter over time
The good news is: you don’t need a $500 smoke machine to find the leak. Many home mechanics use a plain cigar—it makes thick, white smoke that’s easy to see. With the engine off, you put the smoke into the intake system. Wherever smoke comes out, that’s your leak.
This guide tells you:
- What a vacuum leak is
- Why it hurts your engine
- Where leaks usually happen
- Why spray cleaners or soapy water aren’t the best
- How to do the cigar test safely and correctly
- What to do after you find the leak
- How to stop leaks from coming back
Everything is explained in simple steps. No guesswork. No expensive tools. Just clear, practical help to fix the problem yourself—and save money.
What Is a Vacuum Leak?
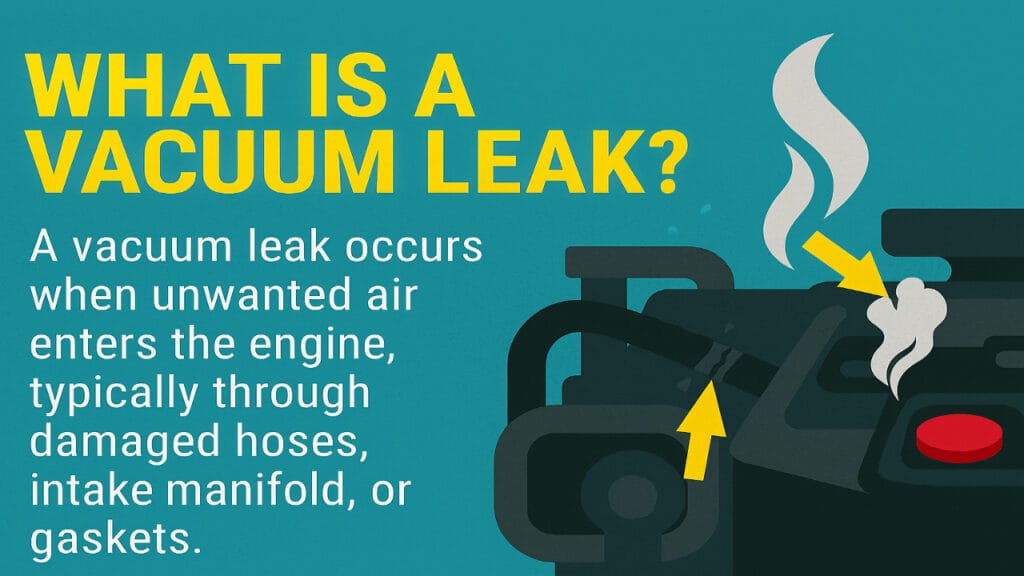
A vacuum leak happens when outside air enters the engine’s intake system without going through the air filter or mass airflow (MAF) sensor. This air is “unmetered,” meaning the engine computer doesn’t know it’s there. As a result, the air-fuel mixture becomes too lean—too much air, not enough fuel.
Engines need a precise mix to run right. The ideal ratio is about 14.7 parts air to 1 part fuel. When extra air sneaks in, that balance breaks. The engine may run, but it won’t run well.
Why Vacuum Leaks Are Bad – More Than Just Rough Idle
Vacuum leaks cause more than just annoying symptoms. Over time, they can lead to serious damage:
- Rough or shaky idle – The engine struggles to stay running at low speed.
- Poor fuel economy – The computer adds extra fuel to compensate, wasting gas.
- Loss of power – The engine feels weak, especially when accelerating.
- Check engine light – Common codes: P0171 (System Too Lean – Bank 1) or P0174 (Bank 2).
- Hard starting – Especially when the engine is cold.
- Failed emissions test – Lean mixtures create high NOx emissions.
- Long-term damage – Running lean makes combustion hotter. This can:
- Melt spark plug electrodes
- Damage oxygen sensors
- Overheat and crack the catalytic converter (a $1,000+ repair)
Fixing a small leak early—like a $5 hose—can prevent big, expensive problems later.
Common Signs of a Vacuum Leak
Watch for these warning signs:
- Engine shakes or surges at idle
- Hissing or whistling noise from under the hood (listen near the firewall or intake)
- Check engine light with lean codes (P0171, P0174, or sometimes P0101)
- Car hesitates or stumbles when you press the gas pedal
- Gas mileage drops suddenly
- Engine stalls when stopped (especially with automatic transmission)
- RPMs jump up and down at idle
Note: Small leaks may only show symptoms when the engine is cold. Larger leaks cause problems all the time.
How Engine Vacuum Works - A Quick Explanation
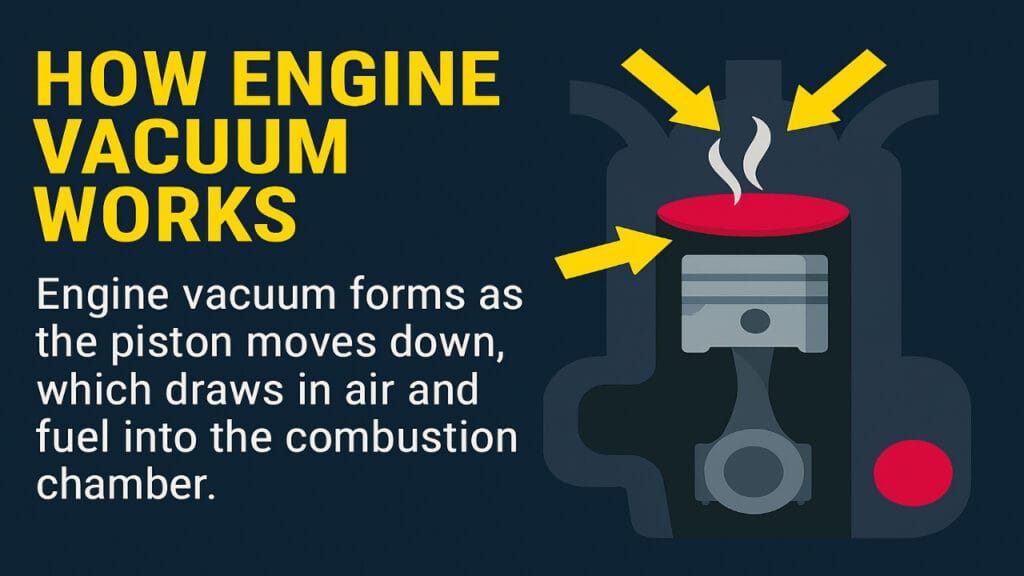
When your engine runs, the pistons move down during the intake stroke. This creates suction—called manifold vacuum. At idle, vacuum is strong (15–22 inches of mercury). Under heavy acceleration, vacuum drops.
This vacuum isn’t wasted—it’s used to power important systems:
- Brake booster: Makes it easier to press the brake pedal. If vacuum is low, brakes feel hard.
- PCV (Positive Crankcase Ventilation) system: Removes harmful blow-by gases from the engine and recycles them into the intake. A leak here can cause oil leaks or sludge.
- EVAP (Evaporative Emission Control) system: Stores fuel vapors from the gas tank and burns them later. Leaks here often trigger P0442 or P0455 codes—but can also affect air-fuel balance.
- HVAC controls: In cars made before 2000, vacuum moves doors inside the heater box to switch between defrost, vent, and floor modes.
All these systems depend on a sealed intake. If air leaks in, vacuum drops—and everything suffers.
Where Vacuum Leaks Most Often Happen
Most leaks come from rubber or plastic parts that wear out over time. Common trouble spots include:
- Vacuum hoses – Especially small ones near the intake manifold. They get brittle from heat and ozone.
- Brake booster hose – A large hose that runs from the intake to the brake booster. Cracks often form where it bends near the firewall.
- Intake manifold gasket – Sits between the intake manifold and cylinder head. Can leak at the edges or around injector ports.
- Throttle body gasket – A small rubber or paper gasket that seals the throttle body to the intake. Dries out and cracks.
- PCV valve and hose – The valve can stick open, or the hose can crack from oil exposure.
- Plastic intake tubes – Found on many modern cars (like Ford, GM, Chrysler). Can crack from vibration or heat.
- EVAP purge valve lines – Small hoses that connect to the charcoal canister. Often overlooked.
- Vacuum “trees” or distribution blocks – Plastic blocks with many small ports. Can crack or break.
Tip: Rubber hoses older than 8–10 years should be replaced—even if they look okay. Age makes them weak.
Why Common Leak-Testing Methods Fall Short
Visual Inspection
- Problem: Many leaks are too small to see. Hairline cracks only open under engine vacuum or when hot.
- Missed spots: Leaks behind the alternator, under the intake, or inside gasket layers.
Carb Cleaner or Brake Cleaner Spray
- How it works: Spray near suspected areas. If RPMs rise, cleaner is being sucked in—confirming a leak.
- Dangers:
- Highly flammable—can ignite on hot exhaust manifolds.
- Damages rubber, plastic, and sensor coatings.
- Doesn’t show you where the leak is—only that one exists.
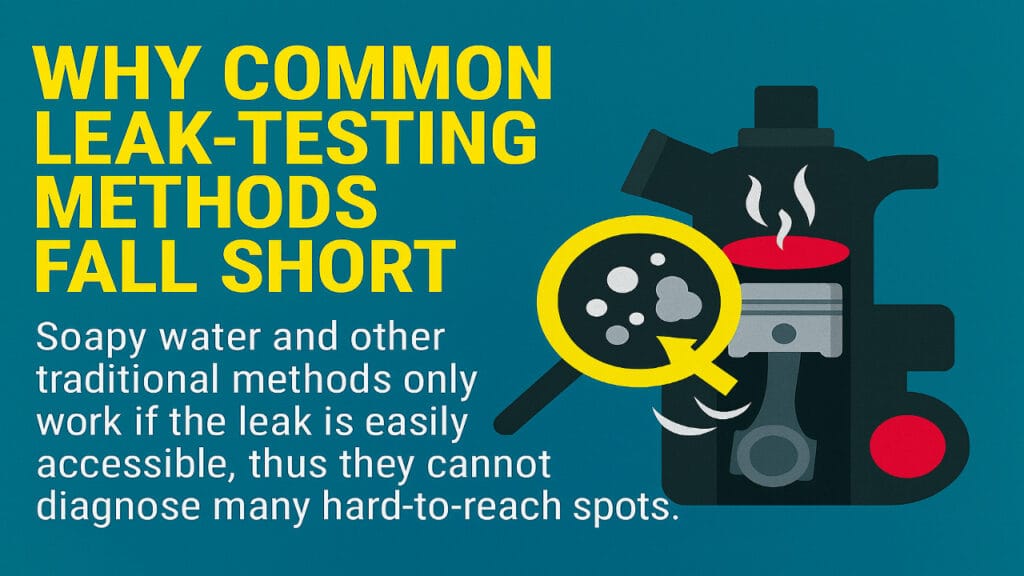
Soapy Water Test
- How it works: Spray soapy water on hoses. Bubbles form at leak sites.
- Problems:
- Water can drip into electrical connectors and cause shorts.
- Hard to use in tight or vertical spaces.
- Messy and slow to dry.
Professional Smoke Machine
- Pros: Finds even pinhole leaks. Safe and non-flammable.
- Cons: Costs $300–$2,000. Not practical for occasional DIY use.
Why a Cigar Is a Smart (and Cheap) Alternative
A plain cigar produces dense, slow-moving, white smoke that:
- Is easy to see, even in daylight
- Flows gently through the intake without pressure
- Escapes visibly from even small cracks
- Costs $1–$5 at most gas stations or convenience stores
Unlike incense (too light) or matches (too brief), a cigar burns steadily for 10–20 minutes—giving you plenty of time to inspect.
Note: Use a cheap, machine-made cigar. Flavored cigars contain oils that can leave residue. Avoid cigars with sweet wrappers.
Safety Rules – Do Not Skip These

Vacuum leak testing with smoke involves fire and fumes. Follow these rules:
- Engine must be OFF and completely cool – Never test while running.
- Wear safety glasses and nitrile gloves – Protect eyes and skin.
- Work in a well-ventilated area – Open garage door or work outside.
- Do NOT breathe the smoke – Cigar smoke contains tar, nicotine, and carcinogens.
- Keep water, sand, or a fire extinguisher nearby – In case of accidental fire.
- Never light a cigar near fuel lines, oil, or the battery – Vapors can ignite.
- Never leave the cigar unattended – Stay with it the entire time.
What You’ll Need – Full List
- 1 plain cigar (no flavor, no sweet tip)
- Rubber vacuum hose (e.g., brake booster line – usually 5/16" or 3/8" ID)
- Needle-nose pliers (to remove clamped hoses)
- Bright LED flashlight (for spotting smoke trails)
- Safety glasses
- Nitrile gloves
- Golf tees, small bolts, or tape (to plug unused vacuum ports)
- Plastic sandwich bag + rubber band (to seal the throttle body)
- Chalk or masking tape (to mark leak locations)
Step-by-Step: How to Perform the Cigar Smoke Test
Prepare the Car
- Park on level ground. Set the parking brake.
- Turn off the engine and remove the key.
- Open the hood. Remove any plastic engine covers.
Choose the Smoke Entry Point
Pick a large, direct vacuum source connected to the intake manifold:
- Best choice: Brake booster hose (thickest hose, goes to brake pedal)
- Good alternative: PCV valve hose
- Avoid: Small hoses to solenoids—they restrict smoke flow
Disconnect the Hose
- Use pliers to loosen any clamp.
- Gently pull the hose off the metal or plastic nipple on the intake.
Seal the System
- Plug all other open vacuum ports with golf tees, bolts, or tape.
- Seal the throttle body: Stretch a plastic bag over the air intake opening and secure it with a rubber band. This traps smoke inside.
Why this matters: If you don’t seal the system, smoke will just blow out the front—and you won’t see leaks.
Light the Cigar
- Light the end and let it burn for 30–60 seconds until it produces steady smoke.
- Do not puff—just let it smolder.
- Place it in a metal can or ashtray for safety.
Introduce Smoke
- Insert the smoldering end into the disconnected vacuum hose.
- Let smoke flow in naturally. Do not blow—this can force ash into the engine.
Wait and Watch
- Wait 10–30 seconds for smoke to fill the intake.
- Slowly move your flashlight sideways across all hoses, gaskets, and connections.
- Look for thin streams or puffs of smoke escaping—this is your leak.
Pro tip: Shine the light at a low angle. Smoke scatters the light and becomes much easier to see.
Mark and Fix
- Mark the leak with chalk or tape.
- Common fixes:
- Cracked hose: Cut out bad section or replace entire hose ($2–$10)
- Loose clamp: Tighten with pliers
- Bad gasket: Replace throttle body or intake manifold gasket ($10–$50)
- Cracked plastic tube: Replace with OEM or silicone part
Tips for Best Results

- Test in low light: Early morning, dusk, or a dark garage works best.
- Check twice: Once cold, once after a short drive (some leaks only open when hot).
- Use a mirror: For hard-to-see areas like the back of the intake manifold.
- Don’t rush: Move slowly. Small leaks release just a wisp of smoke.
- Replace old hoses proactively: If one hose is cracked, others are likely close behind.
What If You Don’t Want to Use a Cigar?
Incense Stick
- Light an incense stick and let it smolder.
- Use a large syringe (50ml) or turkey baster to draw smoke and push it into the hose.
- Downside: Smoke is lighter and harder to see. Best in total darkness.
DIY Smoke Generator (Smoke Jar)
You’ll need:
- Clean glass jar with metal lid
- Small birthday candle
- Aquarium air pump
- Two pieces of flexible tubing (1/4" ID)
- Rubber stopper or drilled lid
How to build it:
- Melt the base of a candle and stick it to the inside of the jar lid.
- Drill two holes in the lid.
- Insert tubing: one goes near the candle (air in), the other goes to your intake (smoke out).
- Light the candle, then blow it out so it smolders.
- Turn on the air pump—the airflow carries smoke into the engine.
- Safer than open flame
- Reusable
- Produces steady smoke
Never use paper, leaves, or trash—they burn unpredictably and leave ash.
How to Prevent Vacuum Leaks in the Future
Prevention is easier (and cheaper) than repair:
- Inspect all vacuum hoses every oil change – Squeeze them. If they feel hard, crunchy, or cracked, replace them.
- Use high-temp silicone vacuum hose – Lasts 2–3 times longer than rubber. Resists heat, oil, and ozone.
- Replace the PCV valve every 50,000 miles – A stuck-open PCV valve acts like a vacuum leak.
- Avoid zip ties on vacuum lines – They can cut into hoses over time. Use proper hose clamps instead.
- Keep rodents out – Mice and rats chew rubber hoses. Use peppermint oil or ultrasonic repellents in the engine bay.
- Don’t overtighten clamps – This can pinch or crack hoses.
When to Call a Professional Mechanic
The cigar method finds most leaks—but not all. See a pro if:
- You’ve checked everything and still get lean codes
- The leak is inside the intake manifold (e.g., between upper and lower sections)
- You suspect a cracked cylinder head or intake port
- The engine runs lean only under load (may be fuel delivery issue)
- You smell raw fuel or see black smoke (could be injector or MAF problem)
- Trouble codes return after repair
A shop can:
- Use a professional smoke machine with UV dye for invisible leaks
- Read live fuel trim data (short-term and long-term) to confirm lean condition
- Perform a smoke test under slight pressure (some shops do this)
Conclusion
Vacuum leaks are common, but they don’t have to be expensive. The cigar method is a smart, low-cost way to find most leaks at home. It’s safer than carb cleaner, cheaper than a smoke machine, and more reliable than guessing. Always put safety first. Fix leaks as soon as you find them. And remember: a $5 hose today can save you a $1,500 catalytic converter tomorrow.
Common FAQ's
A vacuum leak lets unmetered air in, causing lean codes. A smoke machine finds it - Harbor Freight sells affordable ones, so you don’t need a cigar.
Yes, a smoke machine is one of the best ways to find a vacuum leak - it safely fills the intake with visible smoke so leaks are easy to spot.
To check for vacuum leaks, plug the intake, connect the smoke machine, fill the system with smoke, and watch where it escapes - no engine running needed.